👉前言
在前文中,我们已经学会了如何搭建博客的基础框架。本文将进一步讲述博客主题的美化和添加一些实用功能的方法,例如评论系统、百度统计、雪花飘落、live2d看板娘、鼠标点击显示字体效果、烟花爆炸效果等等。
提示: 不同主题的添加方法可能有所不同,即便是相同主题的不同版本,配置方法也可能有所差异。个性化需要一定的前端基础,了解 HTML、CSS、JS,以及了解 CSS 预处理语言 Sass、Less,并了解Hexo的文件目录结构。
不过,只要选择好主题,认真阅读主题文档,大致了解每个文件对应网页的哪个部分,再仔细阅读本篇教程,相信你一定能够轻松掌握💪🏻💪🏻
🐠一、添加live2d看板娘
在右下角添加一个可爱的看板娘,通过命令行输入 npm install --save hexo-helper-live2d 来获取插件。
然后,通过输入 npm install [name] 下载相应的模型,将 [name] 替换成模型名称。更多模型选择请参考原作者的博客。
打开站点目录下的 _config.yml 文件,添加如下代码:
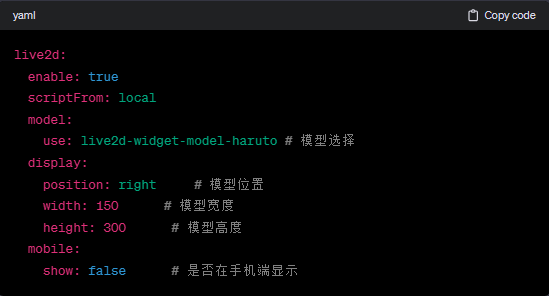
设置好后,我们的博客将拥有一个小可爱😇。

🍧二、添加鼠标点击效果
爱心效果
在 themes/你选择的主题/source/js 下新建文件 heart.js,并添加以下代码:
(function (e, t, a) {
function n() {
c( ".heart{width: 10px;height: 10px;position: fixed;background: #f00;transform: rotate(45deg);-webkit-transform: rotate(45deg);-moz-transform: rotate(45deg);}.heart:after,.heart:before{content: '';width: inherit;height: inherit;background: inherit;border-radius: 50%;-webkit-border-radius: 500%;-moz-border-radius: 50%;position: fixed;}.heart:after{top: -5px;}.heart:before{left: -5px;}" ),
o(),
r(); }
function r() {
for (var e = 0; e < d.length; e++) d[e].alpha <= 0 ? (t.body.removeChild(d[e].el), d.splice(e, 1)) : (d[e].y--, (d[e].scale += 0.004), (d[e].alpha -= 0.013), (d[e].el.style.cssText =
"left:" + d[e].x +
"px;top:" + d[e].y +
"px;opacity:" + d[e].alpha +
";transform:scale(" + d[e].scale +
"," + d[e].scale +
") rotate(45deg);background:" + d[e].color +
";z-index:99999"));
requestAnimationFrame(r); }
function o() {
var t = "function" == typeof e.onclick && e.onclick; e.onclick = function (e) { t && t(), i(e); }; }
function i(e) {
var a = t.createElement("div"); (a.className = "heart"), d.push({
el: a,
x: e.clientX - 5,
y: e.clientY - 5,
scale: 1,
alpha: 1,
color: s(), }), t.body.appendChild(a); }
function c(e) {
var a = t.createElement("style"); a.type = "text/css";
try { a.appendChild(t.createTextNode(e)); } catch (t) { a.styleSheet.cssText = e; } t.getElementsByTagName("head")[0].appendChild(a); }
function s() {
return (
"rgb(" + ~~(255 * Math.random()) +
"," + ~~(255 * Math.random()) +
"," + ~~(255 * Math.random()) +
")" ); }
var d = []; (e.requestAnimationFrame = (function () {
return ( e.requestAnimationFrame || e.webkitRequestAnimationFrame || e.mozRequestAnimationFrame || e.oRequestAnimationFrame || e.msRequestAnimationFrame ||
function (e) {
setTimeout(e, 1e3 / 60); } ); })()),
n(); })(window, document);
在themes/你选择的主题/layout/layout.ejs下添加:

完成以上步骤后,当我们点击鼠标时就能看到爱心的特效了。

🐷文字效果增强
在themes/你选择的主题/source/js目录下新建文件show_text.js,并添加以下代码:
var a_idx = 0;
jQuery(document).ready(function($) { $("body").click(function(e) {
var a = new Array
("富强", "民主", "文明", "和谐", "自由", "平等", "公正", "法治", "爱国", "敬业", "诚信", "友善");
var $i = $("<span/>").text(a[a_idx]); a_idx = (a_idx + 1) % a.length;
var x = e.pageX, y = e.pageY; $i.css({
"z-index": 5,
"top": y - 20,
"left": x,
"position": "absolute",
"font-weight": "bold",
"color": "#FF0000"// 修改颜色处 }); $("body").append($i); $i.animate({
"top": y - 180,
"opacity": 0 },
3000,
function() { $i.remove(); }); });
setTimeout('delay()', 2000); });
function delay() { $(".buryit").removeAttr("onclick"); }
将社会主义核心价值观替换为其他文字,如果想要每次点击显示不同颜色,只需修改其中 color 的值:
"color": "rgb(" + ~~(255 * Math.random()) + "," + ~~(255 * Math.random()) + "," + ~~(255 * Math.random()) + ")"
接着,在themes/你选择的主题/layout/layout.ejs中添加:

🌈注目烟花绽放
在themes/你选择的主题/source/js目录下新建文件firework.js,并添加以下代码:
;
function updateCoords(e) { (pointerX = (e.clientX || e.touches[0].clientX) - canvasEl.getBoundingClientRect().left), (pointerY = e.clientY || e.touches[0].clientY - canvasEl.getBoundingClientRect().top); }
function setParticuleDirection(e) {
var t = (anime.random(0, 360) * Math.PI) / 180, a = anime.random(50, 180), n = [-1, 1][anime.random(0, 1)] * a;
return { x: e.x + n * Math.cos(t), y: e.y + n * Math.sin(t) }; }
function createParticule(e, t) {
var a = {};
return ( (a.x = e), (a.y = t), (a.color = colors[anime.random(0, colors.length - 1)]), (a.radius = anime.random(16, 32)), (a.endPos = setParticuleDirection(a)), (a.draw = function () { ctx.beginPath(), ctx.arc(a.x, a.y, a.radius, 0, 2 * Math.PI, !0), (ctx.fillStyle = a.color), ctx.fill(); }), a ); }
function createCircle(e, t) {
var a = {};
return ( (a.x = e), (a.y = t), (a.color = "#F00"), (a.radius = 0.1), (a.alpha = 0.5), (a.lineWidth = 6), (a.draw = function () { (ctx.globalAlpha = a.alpha), ctx.beginPath(), ctx.arc(a.x, a.y, a.radius, 0, 2 * Math.PI, !0), (ctx.lineWidth = a.lineWidth), (ctx.strokeStyle = a.color), ctx.stroke(), (ctx.globalAlpha = 1); }), a ); }
function renderParticule(e) {
for (var t = 0; t < e.animatables.length; t++) { e.animatables[t].target.draw(); } }
function animateParticules(e, t) {
for (var a = createCircle(e, t), n = [], i = 0; i < numberOfParticules; i++) { n.push(createParticule(e, t)); } anime .timeline() .add({
targets: n,
x: function (e) {
return e.endPos.x; },
y: function (e) {
return e.endPos.y; },
radius: 0.1,
duration: anime.random(1200, 1800),
easing: "easeOutExpo",
update: renderParticule, }) .add({
targets: a,
radius: anime.random(80, 160),
lineWidth: 0,
alpha: { value: 0, easing: "linear", duration: anime.random(600, 800) },
duration: anime.random(1200, 1800),
easing: "easeOutExpo",
update: renderParticule,
offset: 0, }); }
function debounce(e, t) {
var a;
return function () {
var n = this, i = arguments;
clearTimeout(a), (a = setTimeout(function () { e.apply(n, i); }, t)); }; }
var canvasEl = document.querySelector(".fireworks");
if (canvasEl) {
var ctx = canvasEl.getContext("2d"), numberOfParticules = 30, pointerX = 0, pointerY = 0, tap = "mousedown", colors = ["#FF1461", "#18FF92", "#5A87FF", "#FBF38C"], setCanvasSize = debounce(function () { (canvasEl.width = 2 * window.innerWidth), (canvasEl.height = 2 * window.innerHeight), (canvasEl.style.width = window.innerWidth + "px"), (canvasEl.style.height = window.innerHeight + "px"), canvasEl.getContext("2d").scale(2, 2); }, 500), render = anime({
duration: 1 / 0,
update: function () { ctx.clearRect(0, 0, canvasEl.width, canvasEl.height); }, });
document.addEventListener( tap,
function (e) {
"sidebar" !== e.target.id &&
"toggle-sidebar" !== e.target.id &&
"A" !== e.target.nodeName &&
"IMG" !== e.target.nodeName && (render.play(), updateCoords(e), animateParticules(pointerX, pointerY)); }, !1 ),
setCanvasSize(),
window.addEventListener("resize", setCanvasSize, !1); }
在themes/你选择的主题/layout/layout.ejs中添加:
<canvas class="fireworks" style="position: fixed;left: 0;top: 0;z-index: 1; pointer-events: none;" ></canvas>
<script type="text/javascript" src="//cdn.bootcss.com/animejs/2.2.0/anime.min.js"></script>
<script type="text/javascript" src="/js/firework.js"></script>
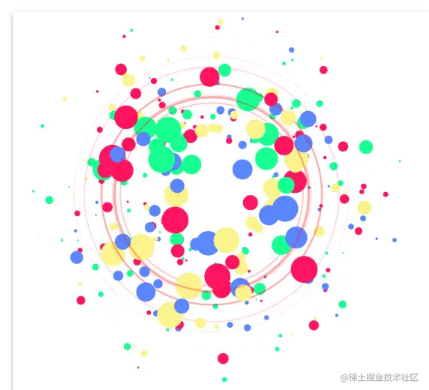
效果如下:
🔄三、记录网站运行时长
打开themes/你选择的主题/layout/_partial/footer.ejs,在其中添加以下代码:
<span id="timeDate">载入天数...</span><span id="times">载入时分秒...</span>
<script> var now = new Date();
function createtime() {
var grt = new Date("08/10/2018 17:38:00"); //在此处修改你的建站时间 now.setTime(now.getTime() + 250); days = (now - grt) / 1000 / 60 / 60 / 24; dnum = Math.floor(days); hours = (now - grt) / 1000 / 60 / 60 - 24 * dnum; hnum = Math.floor(hours);
if (String(hnum).length == 1) { hnum = "0" + hnum; } minutes = (now - grt) / 1000 / 60 - 24 * 60 * dnum - 60 * hnum; mnum = Math.floor(minutes); if (String(mnum).length == 1) { mnum = "0" + mnum; } seconds = (now - grt) / 1000 - 24 * 60 * 60 * dnum - 60 * 60 * hnum - 60 * mnum; snum = Math.round(seconds);
if (String(snum).length == 1) { snum = "0" + snum; }
document.getElementById("timeDate").innerHTML =
"本站已运行 " + dnum + " 天 ";
document.getElementById("times").innerHTML = hnum + " 小时 " + mnum + " 分 " + snum + " 秒"; }
setInterval("createtime()", 250);
</script>
效果如下:

🥂四、提升博客互动性
🐏调皮的浏览器标题
在博客主题的themes/你选择的主题/source/js目录下,新建funny.js文件,添加如下内容:
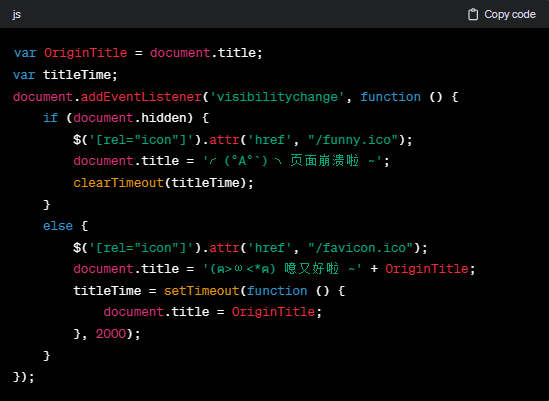
请确保替换其中的favicon.ico和funny.ico为你自己的图标地址。
🐖五、妙趣横生的动态诗词
使用今日诗词API,根据时间、地点、天气和事件智能推荐一句诗词。官网提供了详细的API文档。在你选择的主题中找到 layout/_partial/head.ejs 文件,添加以下代码:
<script src="https://sdk.jinrishici.com/v2/browser/jinrishici.js" charset="utf-8"></script>
如果遇到问题,请检查主题配置文件中subtitle的值是否为false🙈。
🍉六、科技感十足的动态线条背景
在博客主题的themes/你选择的主题/layout/layout.ejs文件中添加:
<!--动态线条背景-->
<script type="text/javascript"
color="122 103 238" opacity='0.7' zIndex="-2" count="200" src="//cdn.bootcss.com/canvas-nest.js/1.0.0/canvas-nest.min.js">
</script>
可以根据需要自行修改color、opacity和count等参数。
🌰七、创造冬日的雪花飘落效果
新建雪花飘落脚本
在博客主题的themes/你选择的主题/source/js目录下,新建snow.js文件,添加以下内容:
(function($){ $.fn.snow = function(options){
var $flake = $('<div id="snowbox" />').css({
'position': 'absolute',
'z-index':'9999',
'top': '-50px' }).html('❄'), documentHeight = $(document).height(), documentWidth = $(document).width(), defaults = { minSize : 10, maxSize : 20, newOn : 1000, flakeColor : "#AFDAEF" /* 可以定义雪花颜色,如#FFFFFF为白色 */ }, options = $.extend({}, defaults, options);
var interval = setInterval( function(){
var startPositionLeft = Math.random() * documentWidth - 100, startOpacity = 0.5 + Math.random(), sizeFlake = options.minSize + Math.random() * options.maxSize, endPositionTop = documentHeight - 200, endPositionLeft = startPositionLeft - 500 + Math.random() * 500, durationFall = documentHeight * 10 + Math.random() * 5000; $flake.clone().appendTo('body').css({
left: startPositionLeft,
opacity: startOpacity,
'font-size': sizeFlake,
color: options.flakeColor }).animate({
top: endPositionTop,
left: endPositionLeft,
opacity: 0.2 }, durationFall, 'linear', function(){ $(this).remove(); }); }, options.newOn); }; })(jQuery); $(function(){ $.fn.snow({ minSize: 5, // 雪花最小尺寸 maxSize: 50, // 雪花最大尺寸 newOn: 300 // 密集程度,数字越小越密集 }); });
添加雪花飘落效果到博客
在博客主题的themes/你选择的主题/layout/layout.ejs文件中添加:

🍚八、集成来必力评论系统
1. 获取来必力评论系统的 UID
首先,访问来必力官网,点击导航栏的“安装”选项。选择免费版本,注册并填写网站信息。完成后,系统会生成一段代码,其中包含 UID,复制该 UID。
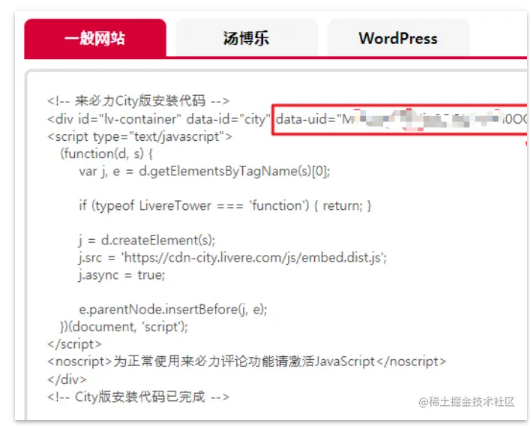
2. 在主题配置中添加评论系统
打开博客主题的配置文件,通常是_config.yml,找到 Livere 评论系统的配置部分,修改如下:

确保替换 YOUR_LIVERE_UID 为你在来必力官网获取的 UID。
3. 集成评论系统
随着上述配置的更改,来必力评论系统将被集成到你的博客中。用户现在可以在博客文章下方看到来必力评论框,方便进行互动和评论。
Valine评论系统集成教程
1. 获取LeanCloud的APPID和APPKEY
首先,访问LeanCloud官网,注册并登录。在控制台中创建一个应用,然后在应用的设置页面找到 APPID 和 APPKEY,复制这两个值。
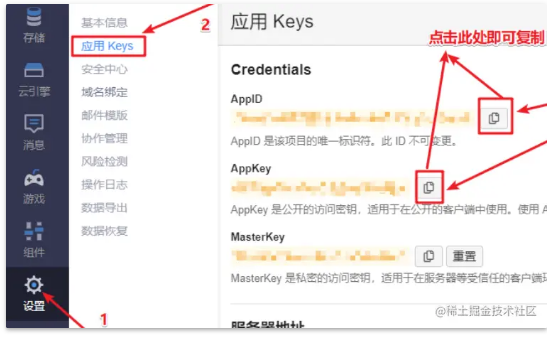
2. 修改主题配置文件
打开博客主题的配置文件,通常是 _config.yml,找到 Valine 评论系统的配置部分,修改如下:
# The configuration of the Valine comment module is not activated by default.
# To use it, activate the configuration item and set appId and appKey.
# Valine 评论模块的配置,默认为不激活,如要使用,就请激活该配置项,并设置 appId 和 appKey.
valine: enable: true # 将false改为true以开启评论系统 appId: YOUR_APP_ID # 将YOUR_APP_ID替换为你在LeanCloud获取的APPID appKey: YOUR_APP_KEY # 将YOUR_APP_KEY替换为你在LeanCloud获取的APPKEY notify: false verify: false visitor: true avatar: 'mm' pageSize: 10 placeholder: '说点什么吧...' # 评论框的提示文本 background: # 设置评论区背景图
确保将 YOUR_APP_ID 和 YOUR_APP_KEY 替换为你在LeanCloud获取的实际值。
3. 集成Valine评论系统
通过上述配置更改,Valine评论系统将被集成到你的博客中。用户现在可以在博客文章下方看到Valine评论框,并使用LeanCloud进行快速、简洁、高效的评论。
🔒九、添加百度统计
1. 注册并登录百度统计
首先,访问百度统计官网,注册并登录。在管理界面的网站列表中添加你的网站地址。
2. 获取百度统计代码
点击网站列表中的你添加的网站,进入管理界面,选择“代码获取”,复制提供的统计代码。
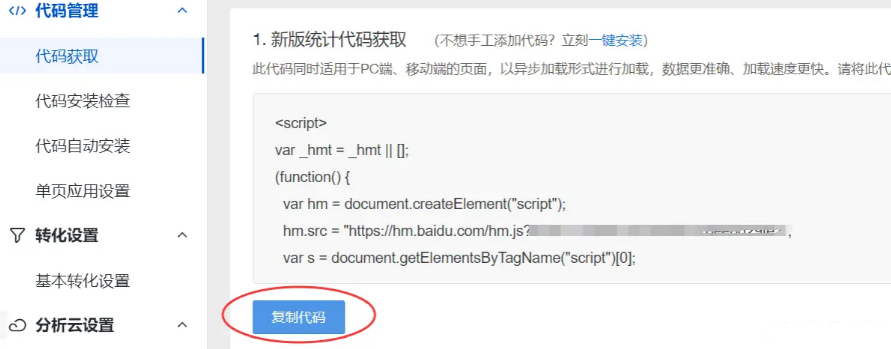
3. 集成百度统计到博客中
在博客主题的 _partial 目录下新建文件 baidu-analytics.ejs,将刚复制的百度统计代码粘贴到该文件中。
打开主题的配置文件,通常是 _config.yml,找到 baidu_analytic 的配置项,将你的统计代码填入:

十、添加各种网页小挂件
访问abowman.com,选择你喜欢的虚拟宠物挂件,复制提供的代码并粘贴到博客中。
访问revolvermaps.com,生成适合你博客的访客地理信息挂件,将提供的代码粘贴到博客中。
访问amazingcounters.com,选择合适的计数器样式,获取代码并集成到博客中。
访问seniverse.com以获取心知天气的免费天气插件代码,将其粘贴到博客中。
最后的主题推荐
如果你想尝试其他主题,以下是一些建议:
保存文件并刷新博客页面,现在你的博客将拥有百度统计和各种有趣的小挂件。如有任何疑问,请随时提出。


